

TV-box mania: I part. X88 PRO 10 (RK3318)
With the help of my Github sponsors (thank you!) I have the opportunity to test different hardware such as grabbers and other IoT devices like ESP8266 / ESP32 to check HyperHDR compatibility or design new software for them like HyperSerialESP8266/HyperSerialEsp32/HyperSPI etc.
With the latest review, I want to open a new chapter for new platforms that can be the hardware base for HyperHDR. The optimal solution like the Raspberry Pi 4 with USB3.0 is not available in the market or the price is about 4 times the initial price. Even the new Raspberry Pi Zero 2W that was recently tested is no longer available or costs over $ 30 in my country, so we have to look elsewhere. For example, testing popular and cheap tv-boxes by trying to install Linux OS on them. I only choose devices that support USB 3.0 as this is an important feature for most USB grabbers.
Disclaimer:
The current supply crisis has unfortunately also affected the tvbox market. The latest new models are almost always inferior to their predecessors or they are much pricier, so you’d better hurry up before the old models run out. H616 is inferior compare to old H6, rk3318 is inferior compare to rk3328, S905x4 is closed for opensource community contrary to the old S905x3.
The most common problem with tvboxes is that most of their Wi-Fi and Bluetooth devices are not supported by Linux Kernel. Even the same model may have a different Wi-Fi chip installed depending on the revision of the main-board (usually also combined with RAM and disk size version). So at worst, you may need to use an Ethernet connection only.
By installing Linux you risk voiding your device warranty and could brick it if something goes wrong. Most of these cheap devices are of low quality and can break without modification anyway.
1 Overview: X88 PRO 10
Today I’m reviewing the weakest and cheapest (under $30) device from my collection:
X88 PRO 10: rk3318 CPU, 2GB RAM and 16GB eMMC


The unit is equipped with:
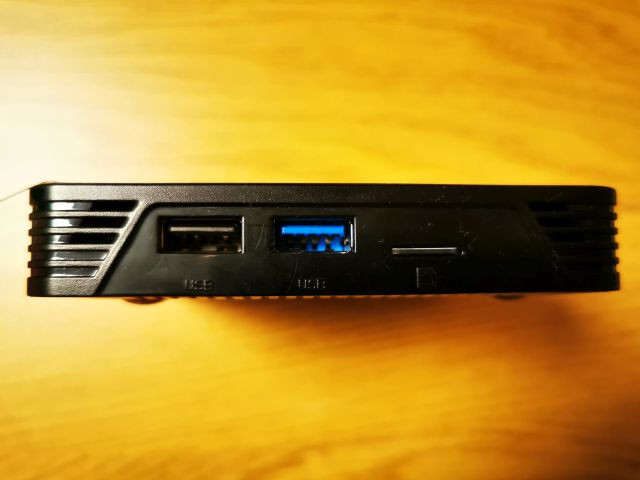
4 cores rk3318 @ 1.1GHz2GB RAM16GB storage2.4 and 5G Wifi (in my case it’s BCM43342 chip)bluetooth1 x USB3.0 and 1 x USB2.0 portsHDMI out, SPDIF, SD card slot
The most common opinion you can find about rk3318 tv-boxes is: don’t buy them. They tend to overheat and do not work stably (in particular USB3.0 port which affects also rk3328). But we will use this model for other purposes than running Android TV and playing 4K movies. And despite the problems encountered, I am very positively surprised by the final effect.
2 Installing Linux: creating Android firmware backup
The Linux installation procedure is largely based on the great work of the @jock developer, which can be found here: csc-armbian-for-rk3318rk3328-tv-box-boards
I chose the safer method of starting armbian from the SD card. You can also install it in the memory inside eMMC, but if you mess up the settings and the system stops booting, you will be in real trouble. During the experiments, my SD card stopped booting several times, but it was enough to re-upload the armbian image to it. If the system were installed on eMMC it probably wouldn’t be possible.
Neccesery tools:
at least 8GB SD card and SD card readerBalena Etcher – SD card flashing utilityJock rk3318 Multitool image, mirror: link (extract it with 7-zip)
Install and run Balena Etcher. Select downloaded multitool image and SD card. Flash it.
Insert multitool SD into TV-box, attach keybord and monitor then start it. Choose backup firmware and after it is creted, shutdown system from the menu.
Eject SD from TV-box and put it in the card reader. You should find your backup created. Save it in safe place.
Now it’s time to erase eMMC. Put multitool card back in the TVBox. After startup select “Erase flash”. Without it prepared custom Armbian image won’t boot. Next shutdown the system and power off the device.
2 Installing Linux: starting Armbian
You need to download @jock special Armbial image for rk3318/rk3328. You can find it here csc-armbian-for-rk3318rk3328-tv-box-boards and also you can find mirror here: Debian Bullseye minimal – mainline kernel 5.15.16
Extract downloaded image with 7-zip and burn it on SD card (if you use the same SD card then remember to copy the created earlier backup first!)
Safely eject the SD card, put it in the tvbox, attach keybord and monitor. Then start it. After few minutes your armbian should be ready for final configuration. Create new user ‘pi’ for everyday usage.
To check out assigned IP type:
ip addressYou can SSH (using Putty) to the TV-box now if you like or continue with the console.
Run rk3318-config. Select safe 1.1GHz speed, don’t select any eMMC option and choose x88 PRO board at the end. Don’t reboot yet.
sudo rk3318-configNext very important commands to install things we need:no longer needed sudo apt-mark hold linux-image-edge-rockchip64 linux-dtb-edge-rockchip64
sudo apt update && sudo apt install armbian-config libxcb1Congratulation. You have (almost) installed Armbian. You may reboot now.
sudo reboot3 Installing Linux: Houston, we have a BCM43342… a problem with WiFi
Edit: After I contacted @jock he put my patch in his distribution. If you are using his latest release, BCM42242 Wifi driver should work from the start.
Unfortunately if you verify dmesg logs you probably find out that your wifi and bluetooth doesn’t work.
dmesgIt’s because BCM43342 is not supported by the Kernel and currently there are no plans for support it. Really bad situation. But we can do something about it.
I’ve managed to extract BCM43342 drivers from my Android X88 Pro 10 backup. But to make them work the Linux Kernel’s Broadcom Wifi driver must also be patched. If you’re using @jock Debian Bullseye 5.15.16 then it can be easily applied by following my script. If you are using different Kernel version then you must patch its sources on your own and copy BCM43342 drivers as well (if wget could not find the file use your web browser to download it: patch, patch mirror)
Connect to your box using for example putty, download and install the patch.
sudo sucd /tmpwget -O patch_wifi_kernel_5_15_16.tar.gz "https://drive.google.com/uc?export=download&id=15QExck5QJSDmX9CZRrFrut_ln4kp_n0v"tar -xf patch_wifi_kernel_5_15_16.tar.gzcp -R -f usr/* /usrcp -R -f lib/* /libReboot now. Your Wifi driver should be enabled in the dmesg.
Now connect and configure your Wifi network using armbian-config:
sudo armbian-config4 Installing HyperHDR
As pi user download latest HyperHDR aarch64 installer. For example:
cd /tmpwget https://github.com/awawa-dev/HyperHDR/releases/download/v17.0.0.0/HyperHDR-17.0.0.0-Linux-aarch64.debsudo apt install ./HyperHDR-17.0.0.0-Linux-aarch64.debHyperHDR should be up and running on 8090 port. If you can’t connect with your browser then execute one more command and check out the output:
/usr/bin/hyperhdr5 HyperHDR tested hardware
LED driver (HyperSerialEsp8266/HyperSerialESP32):CH340g/c detected OKCP2104 detected OKCH9102x detected OK
With my LED setup I tested HyperSerialEsp8266 config.
USB grabbersEzcap 269 – works fine on USB3.0 port offering YUV encodingEzcap 320 – works fine on USB3.0 portEzcap 321 – doesn’t work fully stable connected to USB3.0 port, works fine on USB2.0MS2109 USB2.0 grabber – works fineAV Access – works fine on USB3.0 despite some errors in dmesg, but not with included USB cable, replace it with reliable USB3.1 gen 2 one meter cable. Because in Linux that grabber can not capture at 30FPS (it’s using 60FPS everytime) use following grabber settings for very good result: software frame rate decimation = 2, enable quater frame mode, enable auto-resume. Without these settings CPU usage and latency will be quite high. Av Access doesn’t work on USB2.0. Overall not the best choice for that tv-box
Maximum reached temperature is around 75C
6 Summary
rk3318 X88 PRO 10 offers quite good performance and support for USB3.0. It is not as stable as Raspberry Pi 4 (not perfect USB3.0 compatibility) and there is a lottery with WiFi chips. But if you are OK with that then it’s very interesting option for a very low price. And it’s widely available. I would put it somewhere between Raspberry Pi3/Raspberry Pi Zero 2 W and between Raspberry Pi 4. In next articles I’ll provide more reviews of other tv-boxes. I have big hopes in AmLogic S905X3 solutions, but we’ll see what tests show.